Man Cave
The Shed Project: To turn a basic 2-car garage into a work-shed for all my electronic projects and gear.
Status: Complete!
The shed itself is a 2-car garage, separated from the house itself, with a veranda on the side to cover the side door and a sink (the previous owner-builder had a boat and cleaned fish there) The veranda had a single tube fluro light over the sink. The inside was plain brick with peaked roof with corrugated sheets and basic insulation between the sheets and the framework. Electrical wiring was pretty woeful with things that should not have been allowed to be done.
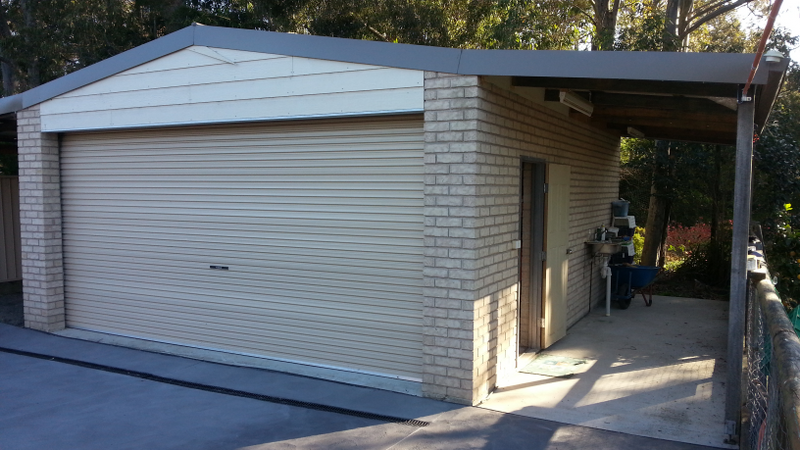
The Shed
The first major step was to fix the electrical wiring: There was a single feed on from the main meter-box on the house to the shed via an underground conduit, only a few cm under the surface! (electrical no-no # 1) where it went from one side of the shed to the other and then into the main inside light switch. It was here that all the rest of the wires were joined together feeding two power points and the outside light (electrical no-no #2). Since the conduit all these wires travelled in was only a 20mm one they all had their secondary insulation stripped off in order to fit (electrical no-no #3). Also none of this wiring had any RCD protection! (electrical no-no #4). Luckily I never had any electrical accidents previously…
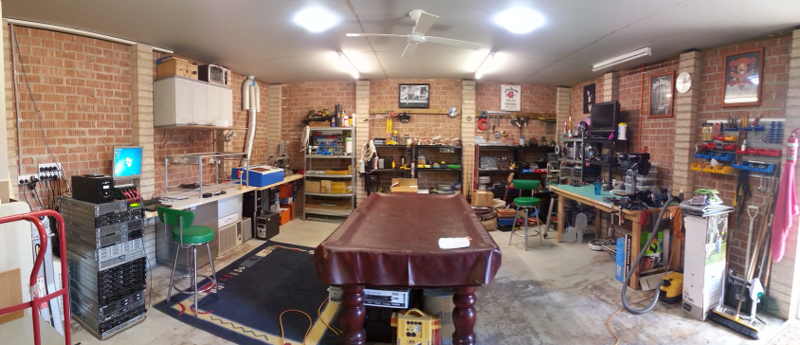
I have now had the entire shed re-wired: the main feed now goes into a new switchbox containing a main circuit breaker. This feeds the power to 3 separate circuits each with their own RCBO (a combined circuit breaker and RCD safety switch). One is for the lights: here I now have two single fluro lights outside under the veranda, the one over the sink and another over the side door. Inside I had installed 6 points for main lighting around a centre point for a ceiling fan, plus a single light point over the main workbench on a separate switch. For Power: I have two separate circuits, one for each side of the shed, each having two sets of power points.
The second major step was installing a proper ceiling, as one of my main issues working out there was dust and crap blowing in and settling on everything in there, also the was an issue with rats that had made a nest or two in between the iron sheets and the insulation, when working outside at night I could hear the buggers scurrying around and could see the silver insulation lining moving. This also meant rat droppings and tufts of fibreglass insulation they’d dig out would drop down on things… As far as the rats go, after employing an electronic rodent deterrent that plugs into a power point and a large rat-trap or three, combined with a few week-long periods of heavy rains and flooding of the back yard that meant the only food available was in the traps… I think that issue is solved for now…
The ceiling has now been installed with the help of a good friend, who also shares the workshed for projects, on one Saturday afternoon. In all 15 sheets of 2400x1200x10mm Gyprock have been put up and I’ve been slowly going around and sealing the gaps in between the sheets and the brickwork. With the ceiling up I’ve also installed the ceiling fan and all the lights. Now its much more comfortable and clean out there!
I now have 3 workbenches in (all made out of house doors! – cheap, solid and good size) one on the right side is the main workbench for soldering etc, two more on the left side end-to-end to hold the CNC machinery (3d-Printer, Laser-Cutter and soon the Pick and Place assembler machine) and also the end next to a planned server-rack for a computer screen and keyboard workstation for working on the servers and any computer related projects out there.
Thanks!
— Radan.

Inspiration Corner
Leave a Reply