Feb 09

DIY Telescope Mount Version 2

Hi!

Another long delay, but this time the telescope project has been totally remade.

All the framework has been machined out of Aluminum sheets making the unit much more rigid without being too heavy, plus re-sized to allow for a larger telescope in the future (the current 4.5″ mirror isn’t all that exciting… ). I’ve also used secondary gearing so I get more torque out of the motors as well as better accuracy – I now get 0.0018 degrees per step.

Electronics are based around the NXP LPCeXpresso dev board using an lpc1769 ARM processor. The NXP chip controls 3 separate motor circuits gated for 12V drivers ( Azimuth, Altitude and Focus) all timed off separate timers so each can be individually speed regulated. Communication with the PC is by a Bluetooth serial module and the board also drives a 132×132 pixel color LCDmodule to show tracking details. This chip runs at 120MHz and has plenty of speed to keep tracking and control as smooth as possible.

I’ve mostly programmed the NXP to emulate the SynScan AltAz GOTO mount commands as well as a few of my own custom for other work. This command set allows easy control via Stellarium software for field work.

This video shows the mount going from flat North to M48 then to the Moon via PC, then I click the Home button on the hand controller at the end.

This video is the same but from the software viewpoint.

Just need to weatherproof the electronics inside a box and add a stable mount. (then get a real telescope for it… )

Until next time!
May 31

DIY Telescope Project – Final Prototype

Hi again,

Finally got around to ordering some better motors. Arrived this morning: 3 NEMA 23 type Steppers. 1.8deg per step 0.4A but more important is the power – 34N/cm. thats about 200 times stronger than the last lot and they feel it, very hard to stop.

So wired them with connectors and plugged into the Driver pcb. Tweaked the software and uploaded it. Made up some quick brackets to hold the motors to the mounts. Ran the tests. Absolutely perfect!

Movement is quite quick and accurate. Driver runs at 200 steps per second with a 1.8 deg motor and 50:1 gearing I get 10,000 steps to 360 degrees or 0.036 deg accuracy. Full 360 deg turn in 50 seconds.

Youtube video for visual show:

Cold, rainy and cloudy outside so no practical testing, still happy with the result though.

All I need to do now is tidy it up and weatherproof it a bit more.

Future changes will be to remake the whole mount out of metal (aluminium) instead of wood. Wood made it easy to chop and change but now it’s pretty set metal will give it more solid movement and better life (and look better 😉 )

Also intend on adding a Bluetooth module to remove the controller wire and to improve the MCU board. I have an NXP Arm proto board here I’d like to use. Gives me the ability to make it more responsive and featured.

Thats all for today.

Radan.

Feb 26

DIY Telescope progresses once again…

Hi again,

Long time no see? 🙂 …

After a long delay due to high workload over xmas sales and having to move house (again), the telescope goto mount progresses.

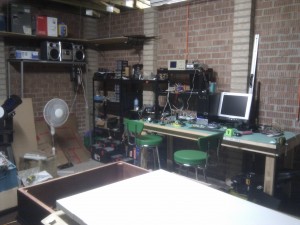
The man-cave is now mostly setup as a workshop and various projects begin once again.

workshop

Man-cave

*A-hem* back to the project 🙂 …

Programming the PIC Micro goes into gear with the motors now controlled by an interrupt service routine. The timer is on about a 5ms tick. each tick it tests the speed setting of each of the 3 motors. If the motor is within 10 degrees of the aim the speed is set to slow by the main routine else it’s fast. The ISR will either tick the motor over every interrupt on fast, or every 4 ticks on slow.

Perhaps a tad rough but its a start and it works 🙂 (well after much debugging and swearing as usual ).

With only 5ms per tick I needed to keep the ISR code as simple as possible, my first attempt had it too slow and there wasn’t enough time for the LCD code in the main routine to work!!!

Also I found the motors turn much smoother and stable with the ISR control. Though I’m not convinced the steppers I chose will be strong enough for the end design but at least they are easy to swap over.

For those of you who may be interested in the code just let me know in the comments, if needed I’ll clean it up and post it.

So onward to sleep 🙂 back again soon I hope!

Thanks!

– Radan.

Oct 04

DIY Astronomy progress

As the above YouTube video shows, circuit now has 3 stepper motors under individual control. Serial IO commands can be sent to set each of the 3 motor positions independently.
Motors will be used for Altitude, Azimuth and focus.
Yes this progress took many modifications both hardware and software as well as much swearing and coffee.
Now I am happy to end another day. Next aim is to put the motors on a timer control so I can control their speed. Then its on to mounting them on the actual mount itself.
Until then, enjoy!


Radan.

Sep 16

DIY Astronomy Progress!

Greetings, work on my DIY Telescope GOTO mount continues again.

ET-Base40 Proto board with PIC16C877 cpu, 2-line LCD Display, Stepper motor and driver board. Wired up for first test.

After several attempts re-learning ‘C’ to program the pic, I have the motor on a swing with the rotation on the LCD display.

Unfortunately due to working on it late at night a couple night ago, I managed to fry one driver chip and destroy a motor. Oh well, progress is not without some costs. (about $7, not really a concern)

Here’s a youtube shot of the action: http://www.youtube.com/watch?v=MIUbCfqXFwA

Time to get back into it, more work to be done!

Thanks!

Radan.